Tuesday, November 29, 2011

Peacock and Gold Christmas Tablescape

I'm loving my Christmas tablescape this year. It's inspired by gold and peacocks. I love both!  I'm so glad gold is making a comeback. It's been a long time coming.  Don't get me wrong, I love silver. But it seems silver is all I've seen for years now. It's a nice change and I think it goes quite well with my peacock inspired theme.

My centerpiece was frugally done. I grabbed some branches from the backyard.  My husband painted them gold with some acrylic paint I had on hand. We placed teal blue and gold ribbon of different widths throughout the branches. I purchased a box of crystals from Marshalls to complete the look.

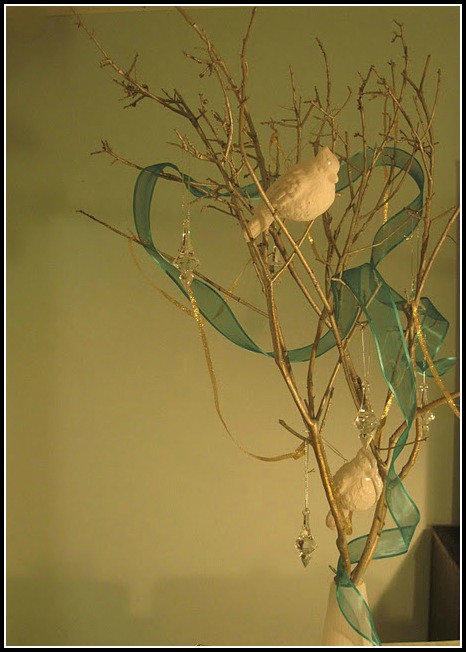
I was finishing my table up and decided I needed just a couple of finishing touches. I added 2 white resin birds. I love white. You'll probably always see pops of white wherever I decorate:)


Everything is finished. The lighting was bad today in my home. For that reason, I added something called a glamour glow to the photo to lighten it up.


Costs breakdown:
Plates were all free. I already owned them. CB2
Gold leafed chargers 6 total- $1.00 a piece from the Dollar Tree
Butterflies a pack of 4- $9.99 from Marshalls
Mercury glass votive holders 4 total- $3.99 a piece. Marshalls
Table Runner- Free and it was actually a scarf I used.
Ribbon- Free (already had on hand)
Peacocks 2 total- 5.95 a piece from Pier One
LED tealight candles- Free (already owned them) Home Goods
Silverware- Free (already owned) Home Goods
Mid-Century modern vase -Free (had that puppy for years now)  Pier One
Wine glasses box of 12- $10.99 Marshalls
Crystals one box- $6.99 Marshalls
Paint- Free (already had on hand)
Spray paint- I wasn't sure whether or not to include this in the cost breakdown. The spray paint was originally for the branches centerpiece. The color I chose was champagne. When the branches were sprayed it came out as a silvery color instead of champagne, which is not what I was going for. So, I used pure gold acrylic paint over the champagne and this is the color I decided to go with.
2 Resin Birds- $5.99 for the pack. Marshalls
                                                     Total: $67.82 without tax


Linking up with:
http://www.centsationalgirl.com/2011/11/tablescape-link-party-homegoods-contest/#more-24364
http://www.houseofhepworths.com/
http://www.sallyleebythesea.com/2011/12/coastal-christmas-day-1-holiday-linky.html?showComment=1322804258926#c4122552932757436842
http://www.sweetlittlegals.com/2011/11/turquoise-lovin-15.html?showComment=1322880940033#c4458251504939869416
http://chiconashoestringdecorating.blogspot.com/2011/12/flaunt-it-friday-82-and-3-shutterfly.html
http://petitehermine.blogspot.com/2011/12/sunday-linky-party-42-goodies.html
http://tatertotsandjello.com/2011/12/weekend-wrap-up-party-and-a-year-of-sugar-scrubs-giveaway-8-winners.html
http://funkyjunkinteriors.blogspot.com/2011/12/sns-111-mantels-and-stockings.html

Friday, November 25, 2011

Dress Your Home and Wedding with Origami


Do you remember making Origami fortune tellers when you were in elementary school? I loved making Origami projects when I was in school. I've seen a lot of  projects around the web and thought it would be inspiring and fun, for those inclined with the patience to do so, to look at these projects and attempt a couple yourself. And while I'm sure you won't be reading into the future with these anytime soon, it will definitely make for cool home decor on the cheap.                                                                    

                                            Inspiration:
                                            

Origami Horse, Rhino, and Giraffe via Z Gallerie
                                                                 

                                  Make Your Own:


via lolosad pictures


Rhino:
http://www.algorithm.co.il/blogs/origami/origami-rhino-instructions/      http://dev.origami.com/images_pdf/rhino.pdf         http://www.fishgoth.com/origami/diagrams/rhino.pdf   


Via Origami


Horse: 
http://www.how-to-origami.co.uk/origami-horse-steps/
http://www.how-to-origami.co.uk/origami-horse-diagram/  

                                               
                                                Paper Lantern:
You'll find the tutorial at the3rsblog
Can you believe this amazing lantern was made with 100's of fortune tellers?          

Speaking of fortune tellers, check out this wedding invitation diy:
Via Kat's Krafts
One Stylish Bride suggests making your own and even using them for wedding favors, programs, or menus. You can download a template from her site.

How about all the different things you could make with Kusudama flowers?

Tutorial for Kusudama flowers via Folding Trees


Read about Kusudama Fever via Paper Crave
Read more about this Origami Christmas Wreath made by Flickr user Malia at Folding Trees.

Wednesday, November 23, 2011

Peacock and Pier One Inspired Christmas High Heeled Stocking Place Setting

I was in Pier One the other day grabbing some last minute things and spotted a really cool high heeled stocking.
Sari Striped Stocking Pier 1
I really like this stocking and decided I would make my own version, only in miniature form for a place setting.  I also made mine in a no sew version since I'm not a sewer.


                                     Tutorial:

1) Make a pattern by drawing a boot on a piece of paper.

2) Pin the pattern onto 2 pieces of felt. For your front and back.

3) Cut out the boot shape on both pieces of felt.

4) Take the front piece of your stocking and stretch your ribbon across just far enough to overlap onto the back. Hot glue the ribbon in place.

5) Continue until you have the stocking covered in the ribbon of your choice.

6) Add any trim or beading that you want.

7) Hot glue the back side of the stocking on.

If there is anything I would do different when making this stocking the first time, it's that I would actually follow my own tutorial. I also would have made the top more even. I tried covering the gap between the shaggy ribbon and the turquoise by adding a second layer of shaggy ribbon lower down. This caused the top to look uneven and it bugs the crap out of my OCD.  I also would have made the heel of the stocking pointy.

Anyhow, this is good for those of us who don't sew but want to add something handmade or different to the table this year without it taking a blue million years to create.  Like I said, this tutorial is perfect for impatient people who can't sew:)


Linking up:
http://www.houseofhepworths.com/2011/11/23/hookin-up-with-hoh-76/
http://alliemakes.blogspot.com/2011/11/making-it-with-allie-thanksgiving-2011.html
http://www.suzyssitcom.com/
http://brandyscrafts.blogspot.com/2011/11/blog-post.html

Tuesday, November 15, 2011

Stretching that Budget with Mod Podge and Paint Vol. 1

Lately,  things I really like are starting to go down hill. For example, a pair of shoes I've had for a short period of time are all scuffed up and funky already. I really don't want to buy a new pair! These are so comfortable and I just purchased several pair at the same time a few months back. I shouldn't need new shoes already. They should still be in good condition.

Ok, maybe I have been wearing this pair like everyday almost. Part of that is because they are so comfortable. The other reason is that the black shoes, ok, navy blue, but no one can tell, ended up being more uncomfortable than I anticipated. The really cute and comfy suede mustard flats I have some how disappeared during my move. Maybe I left them behind?? And, a cute pair of sandals I have, are just that, sandals. I can't wear sandals everyday.(Yes, it's warm enough where I'm at to still wear sandals. Don't hate me.)
I have other shoes but most are just too uncomfortable right now. I use to be the girl who wore heels with everything. Oh, the good ole' days:(

Anyhow, we have to budget our finances. And I'm sure we could squeeze me in some new shoes but I hate to buy a new pair when these are perfectly fine except for how worn they look already. Anyway, here are the shoes. Funky, right?
After and Before

 I was getting tired of being mistaken for a panhandler, so something had to be done. In the name of all things thrifty, I decided it was time to break down and try to salvage these puppies and leave our budget be.

 I noticed Mod Podge seems to be able to do everything. I also noticed the silver glitter and mod podge were sitting right next to me which made a light bulb go off in my head. This just might work for my flats!

While my flats were not exactly glittery, (and I really don't like glitter, not on my clothes anyway) they were shiny. I thought I might be able to fix these up so that I can wear them forever get a few more months out of wearing them!  I also remembered I had seen a post where someone else successfully attempted this with a pair of black flats at Sew Woodsy. I knew this could work!


 I took Mod Podge and coated these pups down. Then, shook glitter all over them til they could hold no more and tapped all of the excess glitter off. Now, at that point, my shoes unfortunately looked as if they were designed by someone named Dorothy Gale of Kansas. I couldn't deal with that. So, I was getting ready to get the blow torch and spray paint out when I spotted some metallic silver acrylic craft paint.

I took the paint and coated the shoes thoroughly and it took the level of glitter down a notch. Phew! Then, I  sealed them with Mod Podge. I did another round just to see if I could make them look as unglittery(is that a word?) as possible. It worked well enough. So here is my after:  


Tip 
Junkie handmade projects

Monday, November 14, 2011

Nifty Finds Around the Blogosphere and Etsy!

Recently, I've run across some nifty little projects around the Blogosphere and Etsy. I'm amazed at how cute and creative people are these days. I just want to eat you all up with a fork and mustard:)

I'm sure you've seen these cute little mustache cups around. Over at Searching Out Simple she came up with a nifty little way to make her own.


It was love at first sight when I saw this Faux Chandelier at Urban Outfitters. But I was really in love when I saw how Amanda at  Burlap and Denim amped it up!


I have to say I was taken by surprise when I found out how Sherika at Passionately Perfect made this nifty chandelier!


I love seeing what I refer to as beard cozies! These 2 are my absolute favorite! Ha ha! These have to be the cutest niftiest projects I've seen around. They're byLauraDesign & BurlyBeard.com . You can see more, including a very seasonally appropriately Santa version!
byLauraDesign & BurlyBeard.com


'Santa and Rudolph in the Photo Booth' at Suzy's Artsy Craftsy Sitcom. Tell me these aren't awesome! Ha ha ha! This is so freaking funny and creative!  You have to go see the rest!


This is so CB2! Vist their DIY Lamp at Weekday Carnival.


These 'painted playing cards' are sooo amazing! Estoy enamorado! I wanted to post all of them, but you'll have to visit Juan Estrella's Etsy page to see the rest of his amazing talent. And trust me you'll want to!


I went ahead and featured myself. Yes, I did:) You can find this Apothecary Eye Chart Jar here


And that's it for now. I'll continue to keep my eye out for interesting, unique, or down right cute content!
Have an amazing week!:)


Tuesday, November 1, 2011

Apothecary Eye Chart Jar

I took down my Halloween decorations from the fireplace mantel today, (well most of them) and wanted to get started with my everyday mantel.I just put up a couple of my Z Gallerie purchases and they are awesomely gracing it as I post.  But I still need more, and I tend to take my time picking things out so it's not quite finished, yet.

I took a picture of my new Z Gal purchases for another post and noticed something when I was going through my photos, there, sitting behind my plain and lonely apothecary jar,  was my homemade eye chart and it looked awesome!  So, I had a lovely Aha! moment.  What if I cut out the letters and mod podged them on the apothecary jar? So, I did and I LOVE it!   Anyhow, here is my apothecary eye chart jar! 


All you need to do is go  to eye chart maker and type your own custom message. Then, save it and print it out. Next, cut out your letters, position them, and Mod Podge them on your apothecary jar. I Mod Podged mine on the outside of the glass to keep it from looking messy.

Here is my half finished mantel. So far I love my apothecary jar and 2 rhino busts from Z Gallerie. I'm not sure if I'll be getting a new mirror and what is going to go up there with them, but so far so good, I have 3 things that I adore!
BTW, I'm still working on my living room and when it's finished I'll posts before and after pics, so stay tuned!


I was Featured at The Bramble Berry Cottage


A Crafty Soiree


The Stuff of Success


Tip 
Junkie handmade projects
Weekend Bloggy Reading


Funky Junk's Sat Nite Special


Making Lemonade


http://www.creativejewishmom.com/